WordPress: Create a Custom Meta Box
This is the second entry of my WordPress development series, providing tutorials on specific things you can do in WordPress. Stay tuned for more!
This tutorial is going to show you how to add your own Custom Meta Box to your posts, pages, or your own custom post types. Custom meta boxes allow you to save additional information. Continuing on from the previous tutorial, I am going to add a custom meta box to my custom posts type “Cats”, which I will use to save the cat’s age and favourite toy.
For simplicity, we will create our custom meta box in our functions.php file. You can edit this file by going to Appearance > Editor in your WordPress admin panel, or using a text editor with FTP.
To begin, we first have to create the custom meta box. We do this by using a function we have used already, add_action().
// Create custom meta box
add_action( 'add_meta_boxes', 'cf_cats_meta_box', 1 );
The first parameter is the name of the action that the second parameter is hooked to. add_meta_boxes runs when the page to edit your post/page loads. The second parameter is the name of our function that prints out the meta box itself. Feel free to name this in a way that makes sense for your custom meta box. I am continuing to use “cf” as my prefix from the previous tutorial, and since this is my “Cats” custom post type, I put that in there as well. The last parameter is set to 1 for priority over other functions, which is optional.
Next we need to create our function that we are calling from add_action().
// Display custom meta box
function cf_cats_meta_box() {
	add_meta_box( 'cf-cat-meta-box', 'Cat Details', 'cf_cat_details', 'cf_cats', 'normal', 'high' );
}
We got a bit going on here, so let’s break it down. add_meta_box() is the function that displays our custom meta box. Inside we have some parameters. The first is the HTML ID name of our meta box. The second is the title of the meta box, which the user will see. The third is the name of our function that we will create to display the content that is INSIDE of our meta box, such as a form. The fourth parameter is the post type. This can be set to ‘post’, ‘page’, or your own custom post type slug. In the previous tutorial I created the post type ‘cf_cats’, which is what I am using here. The last two parameters are for where the meta box should be placed on the edit screen (both optional).
At this point, this is what our custom meta box looks like:
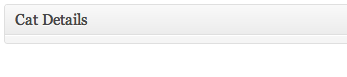
Great! But not very exciting, eh? Now we need to actually have something inside of our meta box.
// Function to display what is inside of our meta box
function cf_cat_details( $post ) {

	// Retrieve saved metadata if it exists
	$cf_cat_age = get_post_meta( $post->ID, '_cf_cat_age', true );
	$cf_cat_toy = get_post_meta( $post->ID, '_cf_cat_toy', true );

	// Create a nonce field for verification
    wp_nonce_field( 'cf_submit_cat', 'cf_cat_check' );

    // The form inside our meta box
	echo '<table class="form-table">
			<tr valign="top">
				<th scope="row"><label for="cf_cat_age">Age:</label></th>
				<td><input type="text" name="cf_cat_age" size="30" maxlength="2" value="' . esc_attr( $cf_cat_age ) . '" /></td>
			</tr>
			<tr valign="top">
				<th scope="row"><label for="cf_cat_toy">Favourite Toy:</label></th>
				<td><input type="text" name="cf_cat_toy" size="30" maxlength="100" value="' . esc_attr( $cf_cat_toy ) . '" /></td>
			</tr>
		</table>';
}
In lines 5 and 6 we are retrieving any previously saved metadata, if it exists, and storing it in variables. In line 9 we have our nonce check, which is for security (more on that later).
Now for the content that we see inside of our meta box, I have decided to create a simple form where a user can input their cat’s age and favourite toy. For the values, you can see we have our variables we declared earlier. This allows us to see what the previous stored data is, if any. It is also important to escape any user inputted data in forms, so we use the esc_attr() function.
If you have a large form, it may be easier to have it in a seperate file and include it in (which is typically done for plugins). However, for this tutorial we will keep it in the same file as it is a small form.
And that’s it! Well, not quite. We now have a custom meta box, but if we try to fill out the form and save the post, the fields return empty. The title and description save, but not our meta box data. That’s because we need to tell WordPress to save the metadata.
// Update/Save cat metadata
add_action('save_post', 'save_cat_metadata');

function save_cat_metadata( $post_id ) {

	// Verify if this is an auto save routine.
	if ( defined( 'DOING_AUTOSAVE' ) && DOING_AUTOSAVE ) {
		return;
	}

	//Check permissions
	if ( !current_user_can( 'publish_posts' ) ) { // Check for capabilities, not role
		wp_die( 'Insufficient Privileges: Sorry, you do not have the capabilities access to this page. Please go back.' );
	}

	// Check nonce named cf_cat_check
	// Verify this came from the our screen and with proper authorization
	if ( !isset( $_POST['cf_cat_check'] )  || !wp_verify_nonce(  $_POST['cf_cat_check'], 'cf_submit_cat' ) ) {
		return;
	}

	// OK, we're authenticated: we need to save the data
	// Verify the meta data is set
	if ( isset( $_POST['cf_cat_age'] ) && isset( $_POST['cf_cat_toy'] ) ) {
		// Save meta data
		update_post_meta( $post_id, '_cf_cat_age', strip_tags( $_POST['cf_cat_age'] ) );
		update_post_meta( $post_id, '_cf_cat_toy', strip_tags( $_POST['cf_cat_toy'] ) );
	}
}
Again, we use the handy add_action() function to hook our own function (parameter two) to the save_post action (parameter one), which as you can guess, happens on saving posts.
Now in our own function, we first check if it is an autosave routine. If it is, we don’t want to do anything as our form hasn’t been submitted. Then we check for permissions. You should always check for permissions based on user capability not role, as capabilities for certain roles (ie. author) can be changed. Following that, we check if our nonce exists.
Once we’ve got the okay, then we save (or update) the meta data. We have three parameters in the update_post_meta() function. The first is the ID of the post, stored in the variable $post_id. The second is the name of the meta key (in the database) of the custom field. And the third is the meta value of the field that we are storing in the database (key/value pairs!).
We use the update_post_meta() function because it acts like the add_post_meta() function if the meta key (in the database) does not exist (creates it in the database). Otherwise, it just updates the value if the key does exist. Best of both worlds!
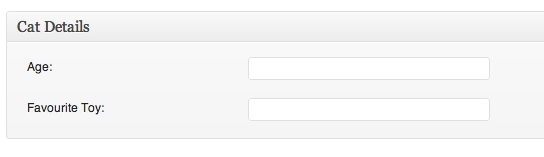
And we’re done! Here’s what my meta box looks like:
Any questions or comments, please reply below!
Ps. I have used some security in this tutorial, but it is too big of a topic that it really needs it’s own. Better yet, the Codex is a great place to start. Make sure to always use security checks, and to sanitize and validate any and all data, especially user input! For example, after the nonce check you could check that data has been input if it is required (you can also use the HTML5 “required” attribute in your forms), and also use preg matches etc., for specific types of data such as emails or phone numbers (which can also be done within forms using HTML5. But you should always have a PHP backup!).