WordPress: Create a Custom Post Type
This is the first entry of my WordPress development series, providing tutorials on specific things you can do in WordPress. Stay tuned for more!
I have been working with Custom Post Types recently, so I want to start off the series with them. Custom Post Types are just like Pages and Posts, but you can call them whatever you like. They can be used for a variety of content such as Events, Bands, a Book database, Cars, Recipes… if you can think of it, it can probably be a Custom Post Type! They are handy because you can separate them from your regular blog Posts, they can be integrated into your themes and plugins, and even created just by using functions.php.
For simplicity, we will create our Custom Post Type in our functions.php file. You can edit this file by going to Appearance > Editor in your WordPress admin panel, or using a text editor with FTP. I’m going to be creating a post type called Cats.

We’ll begin by setting up our Custom Post Type using the add_action() function. We use this function to hook our function (second parameter) to an action (first parameter). The add_action() function can take two more parameters, but we only need these two for now (find out more at the WordPress Codex).
// Set up the custom post type
add_action ( 'init', 'cf_cats_post_type' );
The first parameter, ‘init’, means after WordPress has loaded. The second parameter simply calls our function cf_cats_post_type(). We are telling WordPress to call our function after it (WordPress) has fully loaded.
You can change the name of your function to whatever you like based on what your Custom Post Type is. It’s a good idea to use some sort of prefix, especially if creating a plugin, to avoid conflicts with other function names. So for this tutorial I will use cf_, which is simply the first letters of my first and last names followed by an underscore.
Next, we will set up the arguments for our post type in our function.
function cf_cats_post_type() {
	$cats_labels = array(
		'name' => 'Cats',
		'singular_name' => 'Cat',
		'add_new' => 'Add New Cat',
		'add_new_item' => 'Add New Cat',
		'edit_item' => 'Edit Cat',
		'new_item' => 'New Cat',
		'view_item' => 'View Cat',
		'search_items' => 'Search Cats',
		'not_found' =>  'No Cats Found',
		'not_found_in_trash' => 'No Cats Found in Trash',
	);
	$cats_args = array(
		'labels' => $cats_labels,
		'public' => true,
		'query_var' => 'cf_cats',
		'hierarchical' => false,
		'menu_position' => 5,
		'show_in_nav_menus' => true,
		'rewrite' => true,
		'supports' => array( 'title', 'editor', 'thumbnail' ),
	);

	// Register the custom post type
	register_post_type( 'cf_cats', $cats_args );
}
The first part starting on line 2 is our labels, which are pretty self-explanatory. The labels (which is an argument in line 15) is an array of text strings shown throughout the admin backend for that post type. You don’t have to set every one if you don’t want to as WordPress provides defaults, but I feel it is a good idea to do so for consistency.
Starting on line 14, we have our array of arguments. They may not be obvious as to what they do at first glance, and again you can choose what you want to set or not. I haven’t included all of them here either. Because the WordPress Codex has a thorough explanation of all labels and arguments, you can find all you need to know about them there.
Finally, in the last bit of our function at line 26, we will register our post type. This is done by calling the register_post_type() function. The first parameter is the name of our post type. The second is the array of arguments that we set earlier, stored in the variable $cats_args.
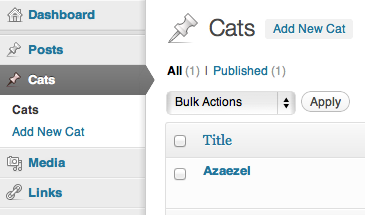
Here’s a preview of my post type. As you can see, mine is below ‘Posts’ in the admin menu (‘menu_position’ => 5) and I have created a post for my cat. You can see how our labels worked, with “Cats” and “Add New Cat” showing up in the admin backend.
And we’re done! If you have any questions or comments please feel free to leave a response below.