WordPress: Create a Custom Widget (Part 1)
This entry is part of my WordPress development series, providing tutorials on specific things you can do in WordPress. Read some more?
WordPress provides a lot of default Widgets that can be useful for displaying additional content in sidebars, footers, etc. But sometimes you may want to use a widget to display content that isn’t available in one of the default widgets, or you want to display the content in a different way. In Part 1 of this tutorial, I will show you how to create a basic custom widget, without any options, that you can use throughout your website to display whatever content you like!
Create Our Widget
In our functions.php file, we begin by creating our own class that extends the WP_Widget class. I have called it My_Cat_Widget, but you should change this to whatever makes sense for the content your widget will contain.
<?php
class My_Cat_Widget extends WP_Widget {

	// Create widget
	public function __construct() {
		parent::__construct(
	 		'my_cat_widget', // Base ID
			'My Cat Widget', // Name
			array( 'description' => 'This is my cat widget.') // Arguments
		);
	}

}
?>
The first section inside our class is where we create our widget. Provide the widget with a base ID, a Name, and in the Arguments, provide a Description. The Name and Description is what you will see in the back-end in the Widgets area of the WordPress admin.
Next, we add the following inside of our class below the first section where we created our widget:
<?php
// Front-End Display of the Widget
public function widget() {

	// Outputs the content of the widget ?>
	<div class="my-cat-widget block">
		<h3>All About Azaezel!</h3>
		<p>Azaezel is my cat, and he is pretty awesome. He's very quiet, but loves to cuddle and sleep most of the day. He is indoor most of winter, but loves to go outside during the summer.</p>
	</div>

<?php } ?>
This section controls what is seen on the front-end of the website, wherever the widget is placed. I have simply added some HTML with copy about my cat, however you could use the WP_Query to create a custom loop of posts from a specific category, for example. Just replace my <div> and its contents with what you would like your widget to display.
Register Our Widget
The final piece (which goes outside of our class), is what registers our widget so we can actually use it:
<?php
// Register widget
add_action( 'widgets_init', function(){
     register_widget( 'My_Cat_Widget' );
});
?>
Putting It All Together
Make sure to change My_Cat_Widget to the name of your class. Our final code looks like this:
<?php
class My_Cat_Widget extends WP_Widget {

	// Create widget
	public function __construct() {
		parent::__construct(
	 		'my_cat_widget', // Base ID
			'My Cat Widget', // Name
			array( 'description' => 'This is my cat widget.') // Arguments
		);
	}

	// Front-End Display of the Widget
	public function widget() {
		// Outputs the content of the widget ?>
		<div class="my-widget block">
			<h3>All About Azaezel!</h3>
			<p>Azaezel is my cat, and he is pretty awesome. He's very quiet, but loves to cuddle and sleep most of the day. He is indoor most of winter, but loves to go outside during the summer.</p>
		</div>
	<?php }
}

// Register widget
add_action( 'widgets_init', function(){
     register_widget( 'My_Cat_Widget' );
});
?>
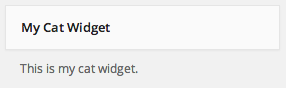
This is what my widget looks like in the back-end. Notice the Name and Description are seen:
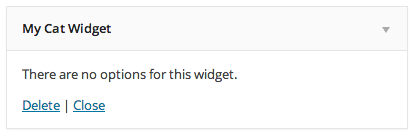
Once I have placed my Widget where I want it in the back-end, it looks like this:
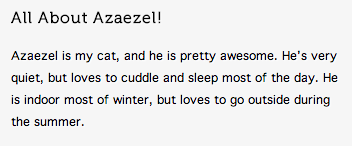
And then on the front-end, we can see the content I placed within it:
That’s all there is to it! The Widget can be used multiple times throughout your website, wherever there are widgetized areas in the theme.
Stay tuned for Part 2, where I will show how to expand this widget to allow options that can be changed in the back-end.